


Navigating the Adobe Purchase Process: A Step-by-Step Guide
Adobe offers an extensive suite of creative tools that cater to professionals, students, and businesses alike. Whether you’re a designer, video editor, photographer, or marketer, Adobe software provides solutions that elevate creativity and streamline workflows. However, before you dive into the world of digital creativity, it’s important to understand the process of how to buy Adobe products efficiently. This step-by-step guide walks you through everything you need to know—from choosing the right plan to finalizing your purchase.
Understanding Adobe’s Product Ecosystem
Before making a purchase, it’s essential to familiarize yourself with Adobe’s range of applications. Adobe Creative Cloud is the central hub for most of Adobe’s software. It includes popular programs like Photoshop, Illustrator, Premiere Pro, After Effects, Lightroom, and Adobe XD. These tools are used for everything from image editing and graphic design to video production and UI/UX development.
Adobe offers individual apps or full Creative Cloud access, giving users flexibility based on their specific needs. For those seeking document management or PDF editing solutions, Adobe Acrobat is available separately or in various bundles. Businesses and teams can benefit from enterprise-grade licensing and administrative tools.
Determining Your Needs Before You Buy Adobe Products
To make an informed decision, identify your specific needs. Ask yourself the following:
- Are you looking to use just one application or multiple?
- Do you prefer a monthly or annual subscription?
- Are you eligible for student or teacher discounts?
- Do you need licenses for a team or business?
Answering these questions will help you choose the right Adobe plan and avoid paying for features you won’t use. Adobe’s pricing structure is based on access level and duration, so understanding your goals upfront can save you time and money.
Choosing the Right Adobe Plan
Once you’ve defined your needs, it’s time to explore the available plans. Adobe offers several subscription models:
Individual Plans: Ideal for freelancers and solo users, these plans let you buy Adobe Creative Cloud All Apps or select individual apps like Photoshop or Illustrator.
Student and Teacher Plans: These offer massive discounts—sometimes over 60% off—for eligible users in education. You’ll need to verify your educational status to qualify.
Business Plans: For teams and companies, Adobe provides Creative Cloud for teams and enterprise options. These come with collaboration tools, centralized administration, and advanced support.
Photography Plan: Specifically designed for photographers, this includes Adobe Photoshop and Lightroom bundled together at a lower price.
Visit Adobe’s official website and browse through the comparison tables to see which plan aligns best with your requirements.
Creating an Adobe Account
Before you can buy Adobe software, you must create an Adobe ID. This account will manage your licenses, software downloads, cloud storage, and billing information.
To create an account:
- Go to Adobe.com and click on “Sign In” at the top right.
- Click “Create an account.”
- Enter your name, email address, and a secure password.
- Verify your email if prompted.
Once your account is active, you can log in to manage your products, download applications, and access customer support.
Navigating the Purchase Page
After logging in, head to the Adobe plans section. Each product or bundle will have its own purchase button and options for monthly or annual payments. You can:
- Choose between paying monthly with no annual commitment or with an annual plan (billed monthly or prepaid).
- See side-by-side comparisons of what’s included in each plan.
- Select any add-ons or additional services you might want.
Clicking the “Buy now” button will take you to a checkout page where you can review the final cost, payment terms, and any trial options available.
Applying Discounts and Promo Codes
Adobe frequently runs promotions, especially for new users or during events like Back-to-School, Black Friday, or Cyber Monday. If you’ve received a promo code, you can apply it during the checkout process. Additionally, if you’re a student, teacher, or part of a non-profit organization, make sure to check if you’re eligible for special pricing.
To use a promo code:
- Add the desired product to your cart.
- Look for the “Enter promo code” box on the checkout page.
- Type the code and click “Apply.”
The discount should reflect immediately, reducing your total amount.
Choosing a Payment Method
Adobe supports various payment methods including:
- Credit/debit cards (Visa, MasterCard, American Express)
- PayPal
- Direct debit (in some regions)
- Bank transfer (for enterprise customers)
After entering your payment details, double-check for any additional taxes based on your location. Adobe automatically calculates VAT or sales tax where applicable.
Once the payment is processed, your subscription begins immediately, and you can start downloading and installing your software.
Downloading and Installing Adobe Software
After purchasing, you’ll gain access to the Adobe Creative Cloud desktop application, which acts as a launcher and updater for all your Adobe products.
- Download Creative Cloud from the Adobe website.
- Sign in using your Adobe ID.
- Browse available applications in the interface.
- Click “Install” next to the apps you’ve purchased.
The Creative Cloud desktop app will manage updates and notify you about new features. You can also customize installation settings such as language, file paths, and plugins.
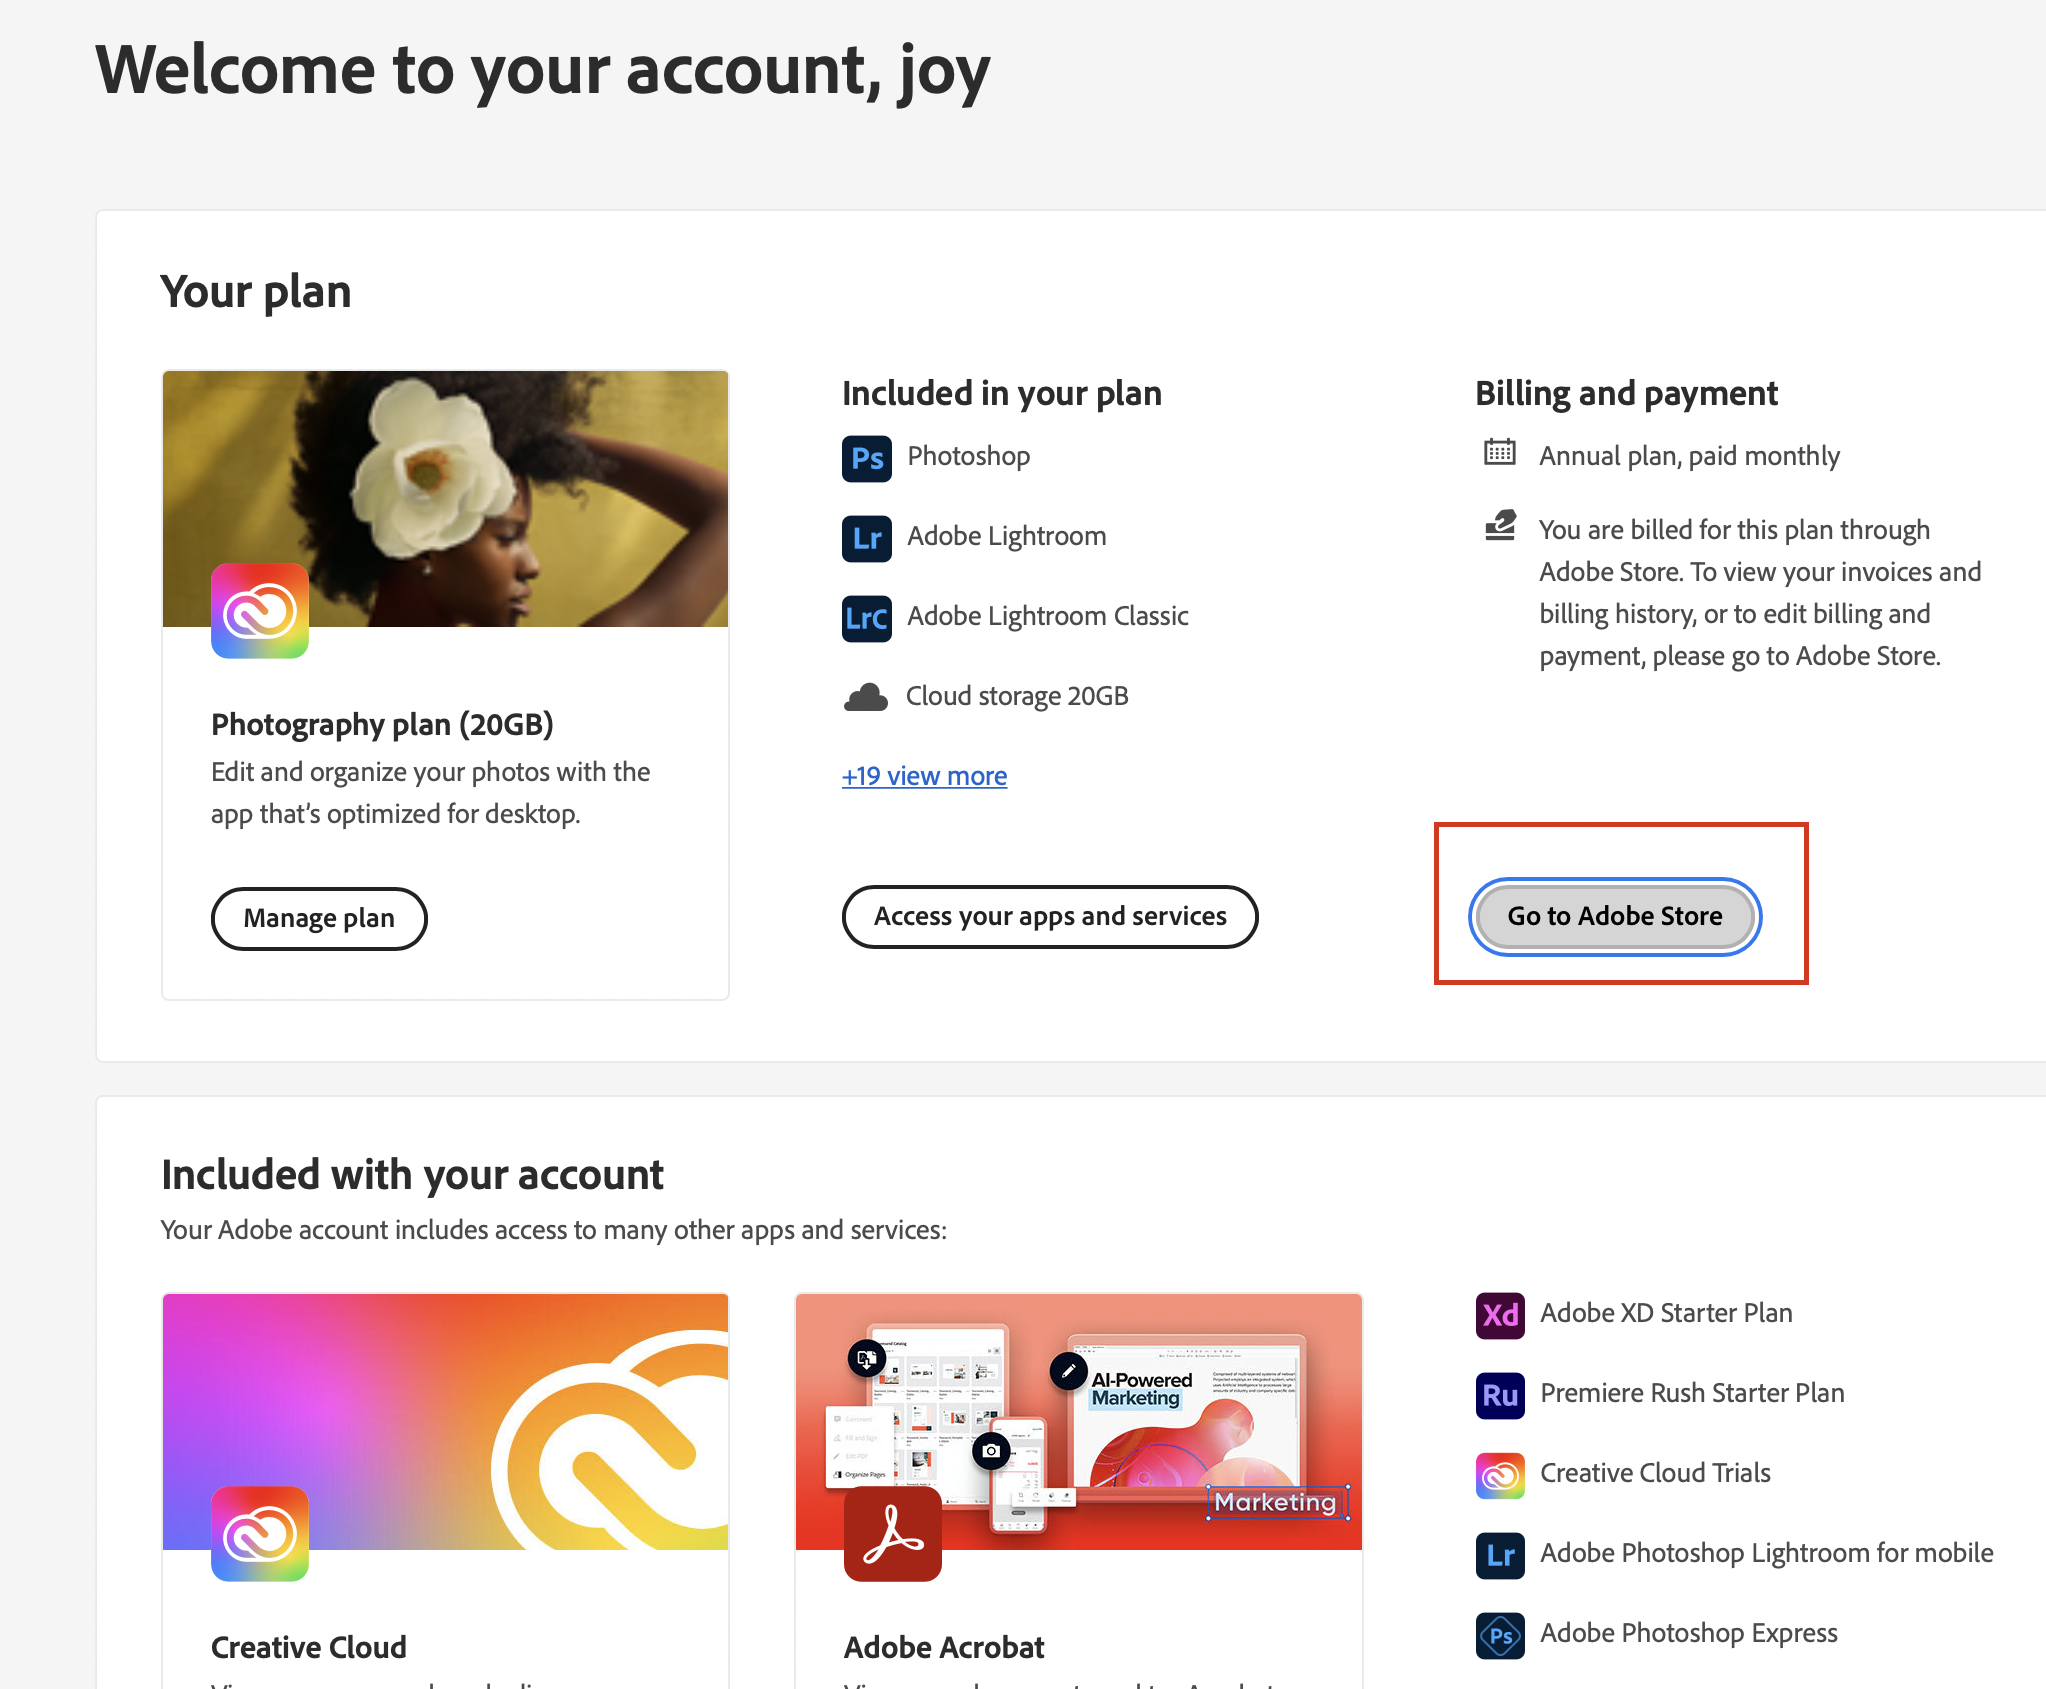
Managing Your Subscription and Billing
You can manage your account by visiting your Adobe account page. Here you can:
- Update payment information
- View billing history
- Switch or cancel plans
- Adjust cloud storage and preferences
Adobe also offers the option to pause your subscription or change billing frequency, depending on your plan.
To avoid any surprises, set a calendar reminder a few days before your renewal date if you’re considering switching or canceling your plan.
Canceling or Changing Your Plan
Adobe allows users to cancel their subscription within 14 days of purchase for a full refund. After this period, early termination fees may apply, especially for annual contracts.
To cancel:
- Log into your Adobe account.
- Go to “Plans & Products.”
- Click on “Manage Plan” and then “Cancel Plan.”
- Follow the on-screen instructions.
You can also upgrade or downgrade your plan based on your changing needs. Adobe’s support team is available via live chat or phone if you need help.
Additional Tips for a Smooth Adobe Buying Experience
- Always buy Adobe products from the official Adobe website or authorized resellers.
- Be cautious of third-party sellers offering significantly lower prices; they may be selling pirated or unauthorized licenses.
- Take advantage of free trials to test out software before making a commitment.
- Regularly back up your creative work using Adobe’s cloud storage or external drives.
Conclusion
To buy Adobe software is to invest in a powerful suite of tools that support creativity, productivity, and professional growth. By understanding the various plans, creating an account, comparing prices, and managing subscriptions, you can ensure a smooth experience from purchase to production. Adobe makes it easy to get started, but making an informed decision ensures you get the best value and the right tools for your creative journey.